User Guide
ciysys Roster iPad app
Updated on: Jan 16, 2021
Overview
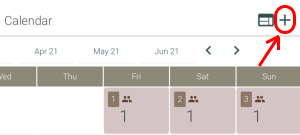
- Tap on the add icon ( located at the top
right corner) to call out new roster entry.
Fill in the details and tap on the save icon (
located at the top right corner).
- Upon saving the new roster entry, the system will populate the head count in the
calendar.
Tap on the weekly view icon (
located at the top right corner) to view the weekly roster.
- To change the assigned shift, tap on the pencil icon ( located at the top right corner) to enable
the edit mode.
Tap on any cell and the shift popup will appear on the right hand side. Tap on any shift
to assign the shift.
To unassign the shift, tap on "Off" option in the shift popup.
- To email the roster to the staff, tap on the more option icon ( located at the top right corner) and
then tap Email option.
Roster entry
- Tap on the add icon ( located at the top
right corner) to call out new roster entry.
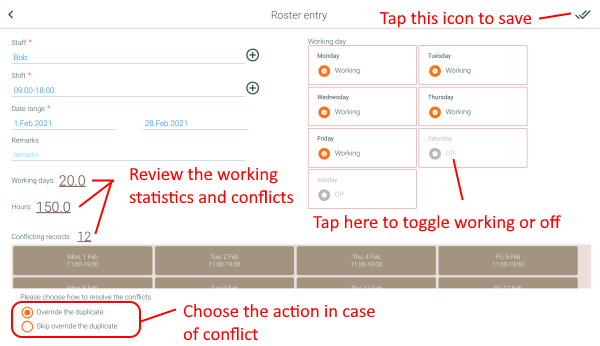
- In the roster entry screen,
- Tap on staff field or on the add icon (
located at the right of the staff
field) to choose the staff.
The staff popup will appear on the right hand side.
- Tap on shift field or on the add icon (
located at the right of the shift
field) to choose the shift.
The shift popup will appear on the right hand side.
- Tap on the date field to fill in the date range.
- After you have chosen the staff, shift, and date range, the system will calculate
the total number of working days and hours.
The total number of working days and hours are affected by "working day" setting.
For example, the date range is 1st March 2018 (Thursday) and you chose "off" for
Thursday option, then the total working days and hours will be zero.
- It also searches for the conflicting (or duplicate) record.
If you have enabled the "overriding the duplicate entry" option, the icon will turn
into orange color ()
and the conflicting records will be replaced upon saving.
- Upon successfully saving the roster entry, the Calendar will appear and you will
see the head count in the calendar.
Roster calendar
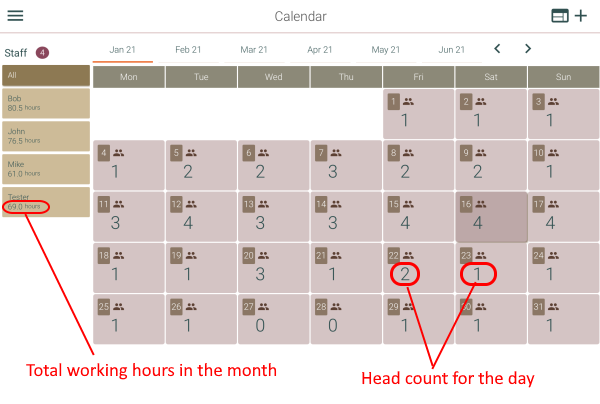
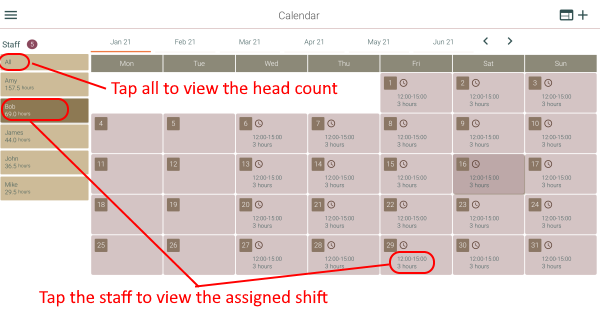
- If you want to see what is the shift that has been assigned to the staff, tap on any
staff from the staff list located at the left.
- To view the number of staff working in any day, tap on the "All" option.
- Notes
the total number of working hours for the month will appear below the staff name. This
value is automatically calculated upon saving the roster entry.
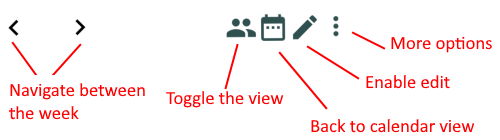
Week view
- In the weekly roster (or week view), there are two views:
- Roster by day - this view shows the staff who is working on that they. If the staff
is off, their name will not appear on the screen.
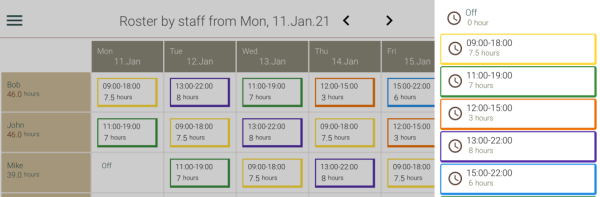
- Roster by staff - this view shows all the staffs (on the left) and the shift that
has been assigned (created with Roster Entry).
- By default, the week view is in read-only mode. To enable the edit mode, tap on the
pencil icon ( located at the top right
corner).
- To change the shift, tap on the cell and the shift popup will appear on the right
hand side. Tap on any shift to assign it.
- To unassign or delete the shift, tap on "Off" option in the shift popup.
- Once you have completed the changes, you may tap on the cross icon ( located at the top right corner) to
switching back to read-only mode which prevent you from accidentally change the data.